About Me

I am the System And Design Analyst at Cypherminds Bangalore. Part time Freelancer.

Thursday, September 28, 2006

Child Portraits

Clicking portraits is my favorite, among other kinds of Photography. It gives such an immense satisfaction. Clicking portraits of an Adult is still fine as there's a good way of communicating with the model. The Photographer can communicate in the plain language, with the model, as to for a particular pose/expression.

The challenge in portraits, is when the subject is a Child. Child portrait involves a lot of involvement. It's not just a portrait, it's a Child's Portrait, so, it should have the charm and innocence, that the child-model carries, Well for most photographers, communicating with the Child is the biggest challenge, Children are prone to distractions. If the surrounding is distractive, the child will hardly be prepared for the photograph. May be that's y most Good Child portraits are clicked indoor (may be in a Studio).

Don't worry, good portraits outdoor could also be done easily, with certain things in mind. Whatever I have learned/experienced, I put forth here. If you think, there could be better solutions to this, please pour in your thoughts.

1. Keep the Surrounding Free from Distractions:

  • Like other Children of the same age group,
  • Avoid noisy places (like a busy street, Shopping mall), Children are uncomfortable!
  • Away from the TV, most Children stare at the screen like there's a ghost!

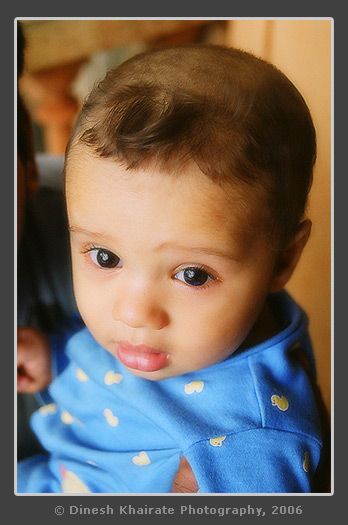
2. Focus at their Eyes:
Children's best feature is their soft and clear eyes. Focus at the eyes, and your portrait is going to be very catchy.

As in the picture below, the Child's pose, isn't that great, but, it's a bit different, as the eyes are kept in focus.


3. Find out their Best Expressions:

Well if it's your child, then no problem, you know what expression is the best your child would give, but, for those like me (bachelor, heee heeee), ask the Child's parent/guardian for the same, and let the child be in that expression when you click.


4. Use Action in your Shots
:
While clicking, try to keep your Shutter speed above 1/250 sec, and let the child move and be playful, the best expressions are guaranteed.
sufficient for now, try them on and see the difference.

Well for those, who already knew these things, please don't blame me, as I am just a learner too here. LOL.


Keep Clicking :)

Wednesday, September 27, 2006

A Wallpaper by me

Sometimes Sitting Idle has it's consequences. I made this wally (Wallpaper) as an effect of such a consequence. Hope you like it! :)There are more for big boys (esp.). Boys, can contact me for those. :)


Sunday, September 24, 2006

DOF (Depth of Field)

As the name suggests, DOF means the amount of sharp portion (Sharp field of view) when looking thru your camera's viewfinder, before or behind the focussed subject. The DOF is controlled by the Aperture of the Camera.

There are many types of camera in the market, but, every camera has got the Aperture, the one like KODAK KB10 (Compact Camera), has a fixed Aperture (which the user can't change). A Camera like NIKON FM10 (Professional in layman's terms or SLR Camera), has a dedicated ring, rotating which sets the Aperture, so here the User has the option to select his/her choice of Aperture.

Aperture, as the Name suggests is the small opening through which the light enters before falling on the Film/Sensor (Sensor in case of Digital Cameras)


As a rule:

Smaller the Aperture size, higher the DOF (means more amount of Field of View is Sharpened). And similarly, Bigger the Aperture, lower the DOF (means less amount of Field of View is Sharpened).

The convention:
The aperture is denoted by the f-stops as something like this as simple numbers (The following is of one of the Nikkor Lenses, these variations at the extremeties, could vary with varying Lenses):

22 16 11 8 5.6 3.5

Now the main convention followed is:
Higher the Value of the f-stop, lesser is the Apperture size.


As can be seen Above, f22 has the smallest Aperture opening, and f5.6 has the largest.

The Challange:
For Any Photographer, the real challange is to select the right aperture before clicking the shot. For example, f16 or higher means everything in the picture (literally) would be sharp, so, it's advisable to select higher f-stops (f11, f16, f22) for Landscapes (f11 is usually suggested, as anything higher does purple fringing, contributed by stray Ultra Violet Rays)

Similarly for Macro Photography (Closing in to the subject and shooting), blurring out the background makes a good sense, as the subject that close will show lot of details, so, it's good to focus the thing we want to show the most. So, it's advisable to select lower f-stops (f1.8, f3.4, f5.6) for Macros.


Please note that, as we go nearer to any object, it's background gets blurred.

Saturday, September 23, 2006

In the Public Interest

Hello Everyone,
Comments have been opened for Everyone, so, Keep Commenting/Criticising, as and when you want. I will be more than delighted.
:)

This is done by me as per the request made by fellow bloggers here.

Thanks for your suggestions. :)

Friday, September 22, 2006

Basics of Photography

Clicking Great Pictures is in the hands of the Photographer, rather than the equipment the photographer uses!

Many times, most of us tend to click pictures as we want (Don't worry, I too do that). And most of those pictures don't come out catchy. For clicking marvelous and amazingly blessed pictures, it's not important to have the world's most sophisticated camera, or the world's most Fortunate Photographer. It's the Composition that does the trick. Keep your composition right, and everything falls the way you want it.

Here are few tips (thumb rules) to compose your pictures:

1. The Rule of Two Thirds (Tells, not to keep the subject in the centre, always!)
Divide your composition (what you see in the Camera's Viewfinder) into nine equal parts as shown in the picture below:

This way, you have to imagine, 4 lines, two vertical and two horizontal. The points where they intersect are the points where our subjects should be present.

As can be seen in this photo clicked by me, the subject is the guy (who inturn is actually busy clicking from his camera) is placed at the Bottom-Right point out of the four points.

Without commenting, if the subject would have been placed at the centre, the picture would have not been, what it is now.

Again, this is not a Hard-n-Fast Rule, it is a Recommendation only. And it means that, it can be broken. But, the perfect photographer is the one, who evaluates, whether or not this rule should be used, for the situation he/she is, before the subject disappears.

And that's one of the biggest challanges for any Amateur Photographer.

See the End Result:

Monday, September 11, 2006

Larger than life!

That's my Elder bro, my guru!

Audi-Glassy-Vista! All in one place

My current Screen's Screen shot!

3500 ft Above Sea Level - Nandi Hills

Early Morning, Almost the sun's waking up. Yawning. It is then this shot was taken by a very eminent Hobbyist Photographer. Its him who actually brought me up. No no.. ofcourse, my Parents did that job. Not about handling my Toddlings, but, about creating my core. Meet my elder brother Akash Khairate.

Hubbing currently at Bangalore, he took out his new Car, arranged a trip with his school friend and his family. To reach this place at 6 am. Expectations, sometimes don't give what is expected, sometimes they give more than that. However, he managed to click some really inspiring photographs at this place, with his D50.

Posted by Picasa

Few Centimeters from the Eye

An Eye for Perfection!

I haven't been this close before to someone's eye ;)

Posted by Picasa

Something about Me

As to start with.. I love Photography. I am a Hobbyist Photographer too. Although difficult to afford! But, I have a better Kismat to still be able to afford it, while studying my BE.

Here's a Casual Click by me of my Watch. Which I just Love!